
Agent Deployment
Overview
Section titled “Overview”Agent deployment on remote servers requires no manual download or configuration. After adding a server on the master, the system automatically generates a one-click install command that can be run on the remote server to complete the entire deployment. Once installed, the server card on the Servers page turns online:
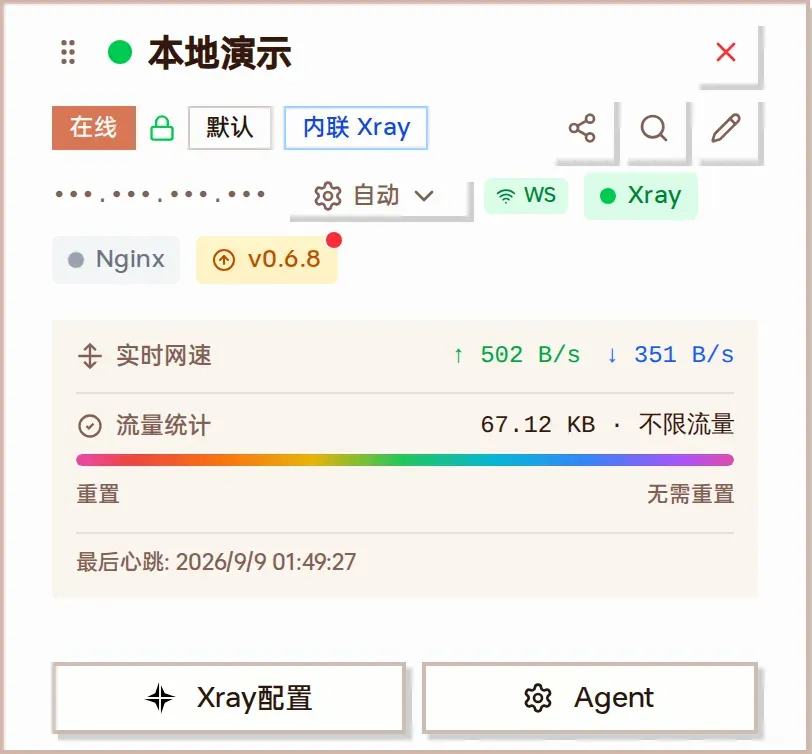
After the Agent connects: online, lock icon (encrypted channel), WS connection, Xray running, Agent version
Xray mode
Section titled “Xray mode”MiaomiaowuX Agent now supports two Xray runtime modes; pick one via the xray_mode parameter of install.sh. Try not to switch back and forth — stop all nodes before switching.
| Mode | Value | Description |
|---|---|---|
| Embedded Xray | embedded | Xray-core is embedded inside the Agent — they share the same process; no standalone /usr/local/bin/xray needed; upgrading the Agent upgrades Xray. Lower footprint, fits stable setups that do not need manual xray surgery. |
| External Xray | external | Installs standalone xray via the official XTLS/Xray-install script; Agent controls it over gRPC. Xray can be upgraded independently, follows the official file layout. The one-click installer defaults to this mode. |
Note: Hysteria2 / AnyTLS and other newer protocols are supported in both modes. In embedded mode, startup errors are logged with the [EmbeddedXray] prefix in the Agent log.
One-Click Installation (Recommended)
Section titled “One-Click Installation (Recommended)”Step 1: Add Server on Master
Section titled “Step 1: Add Server on Master”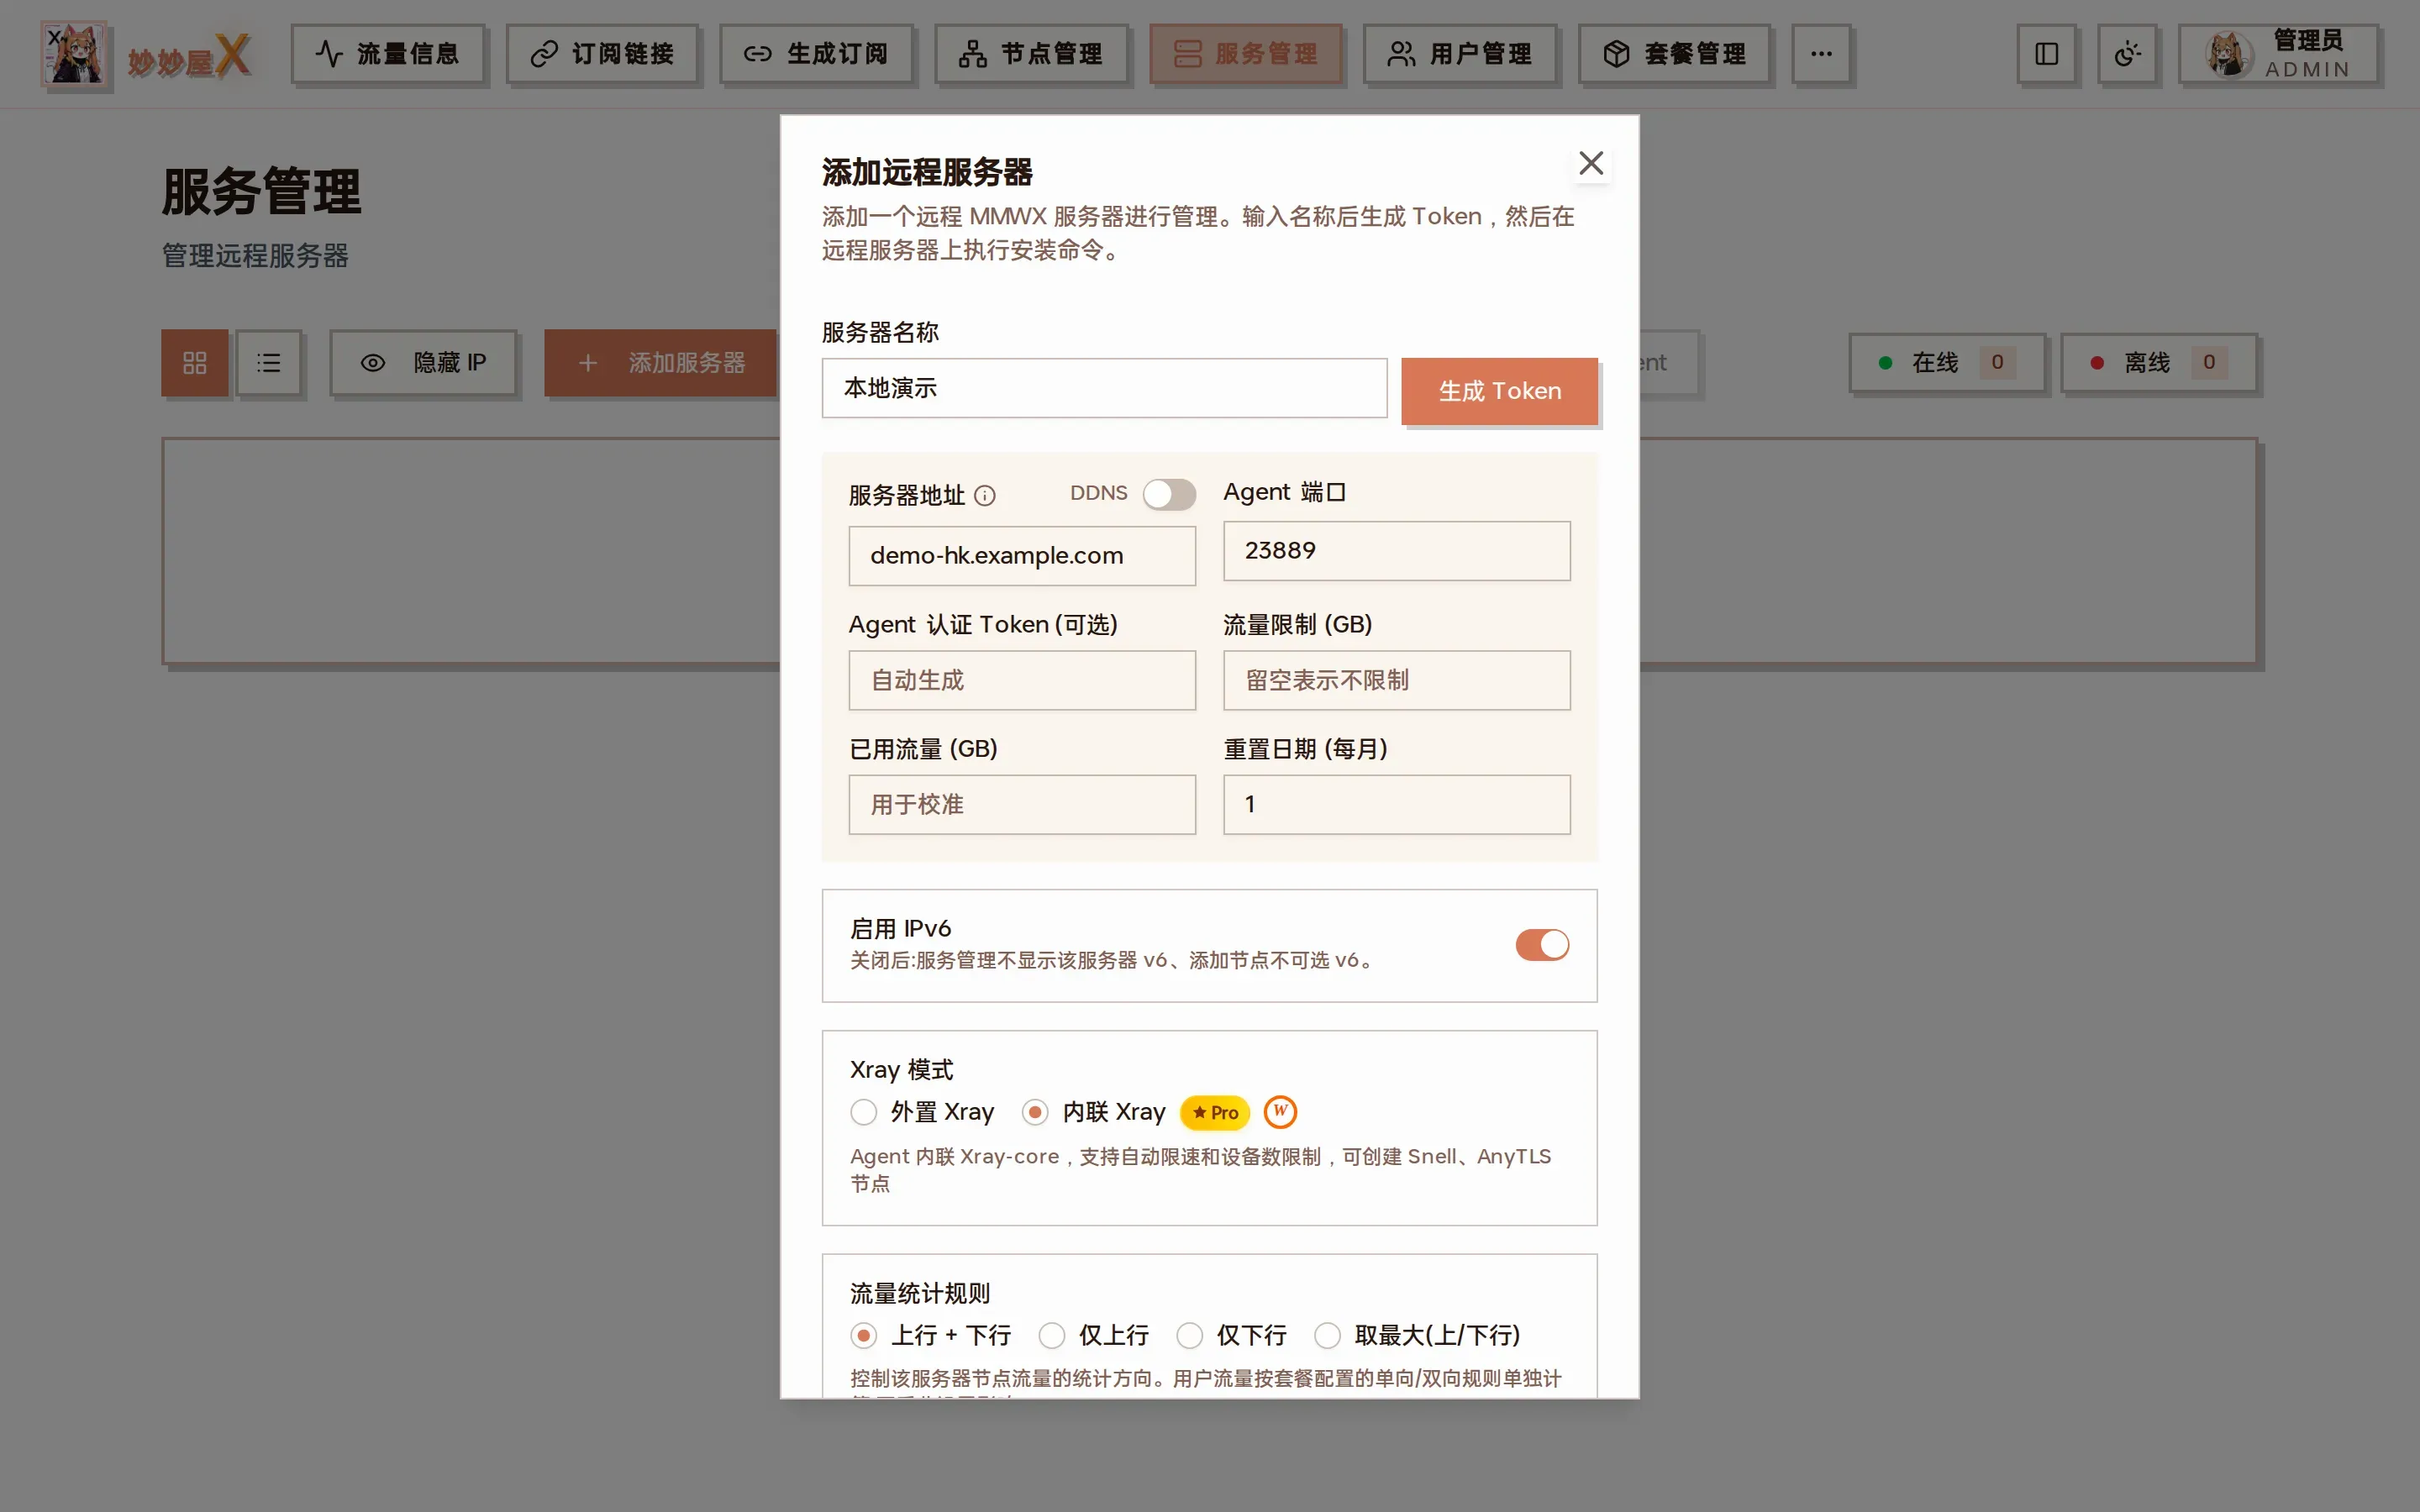
Add remote server: name, address, external / embedded Xray
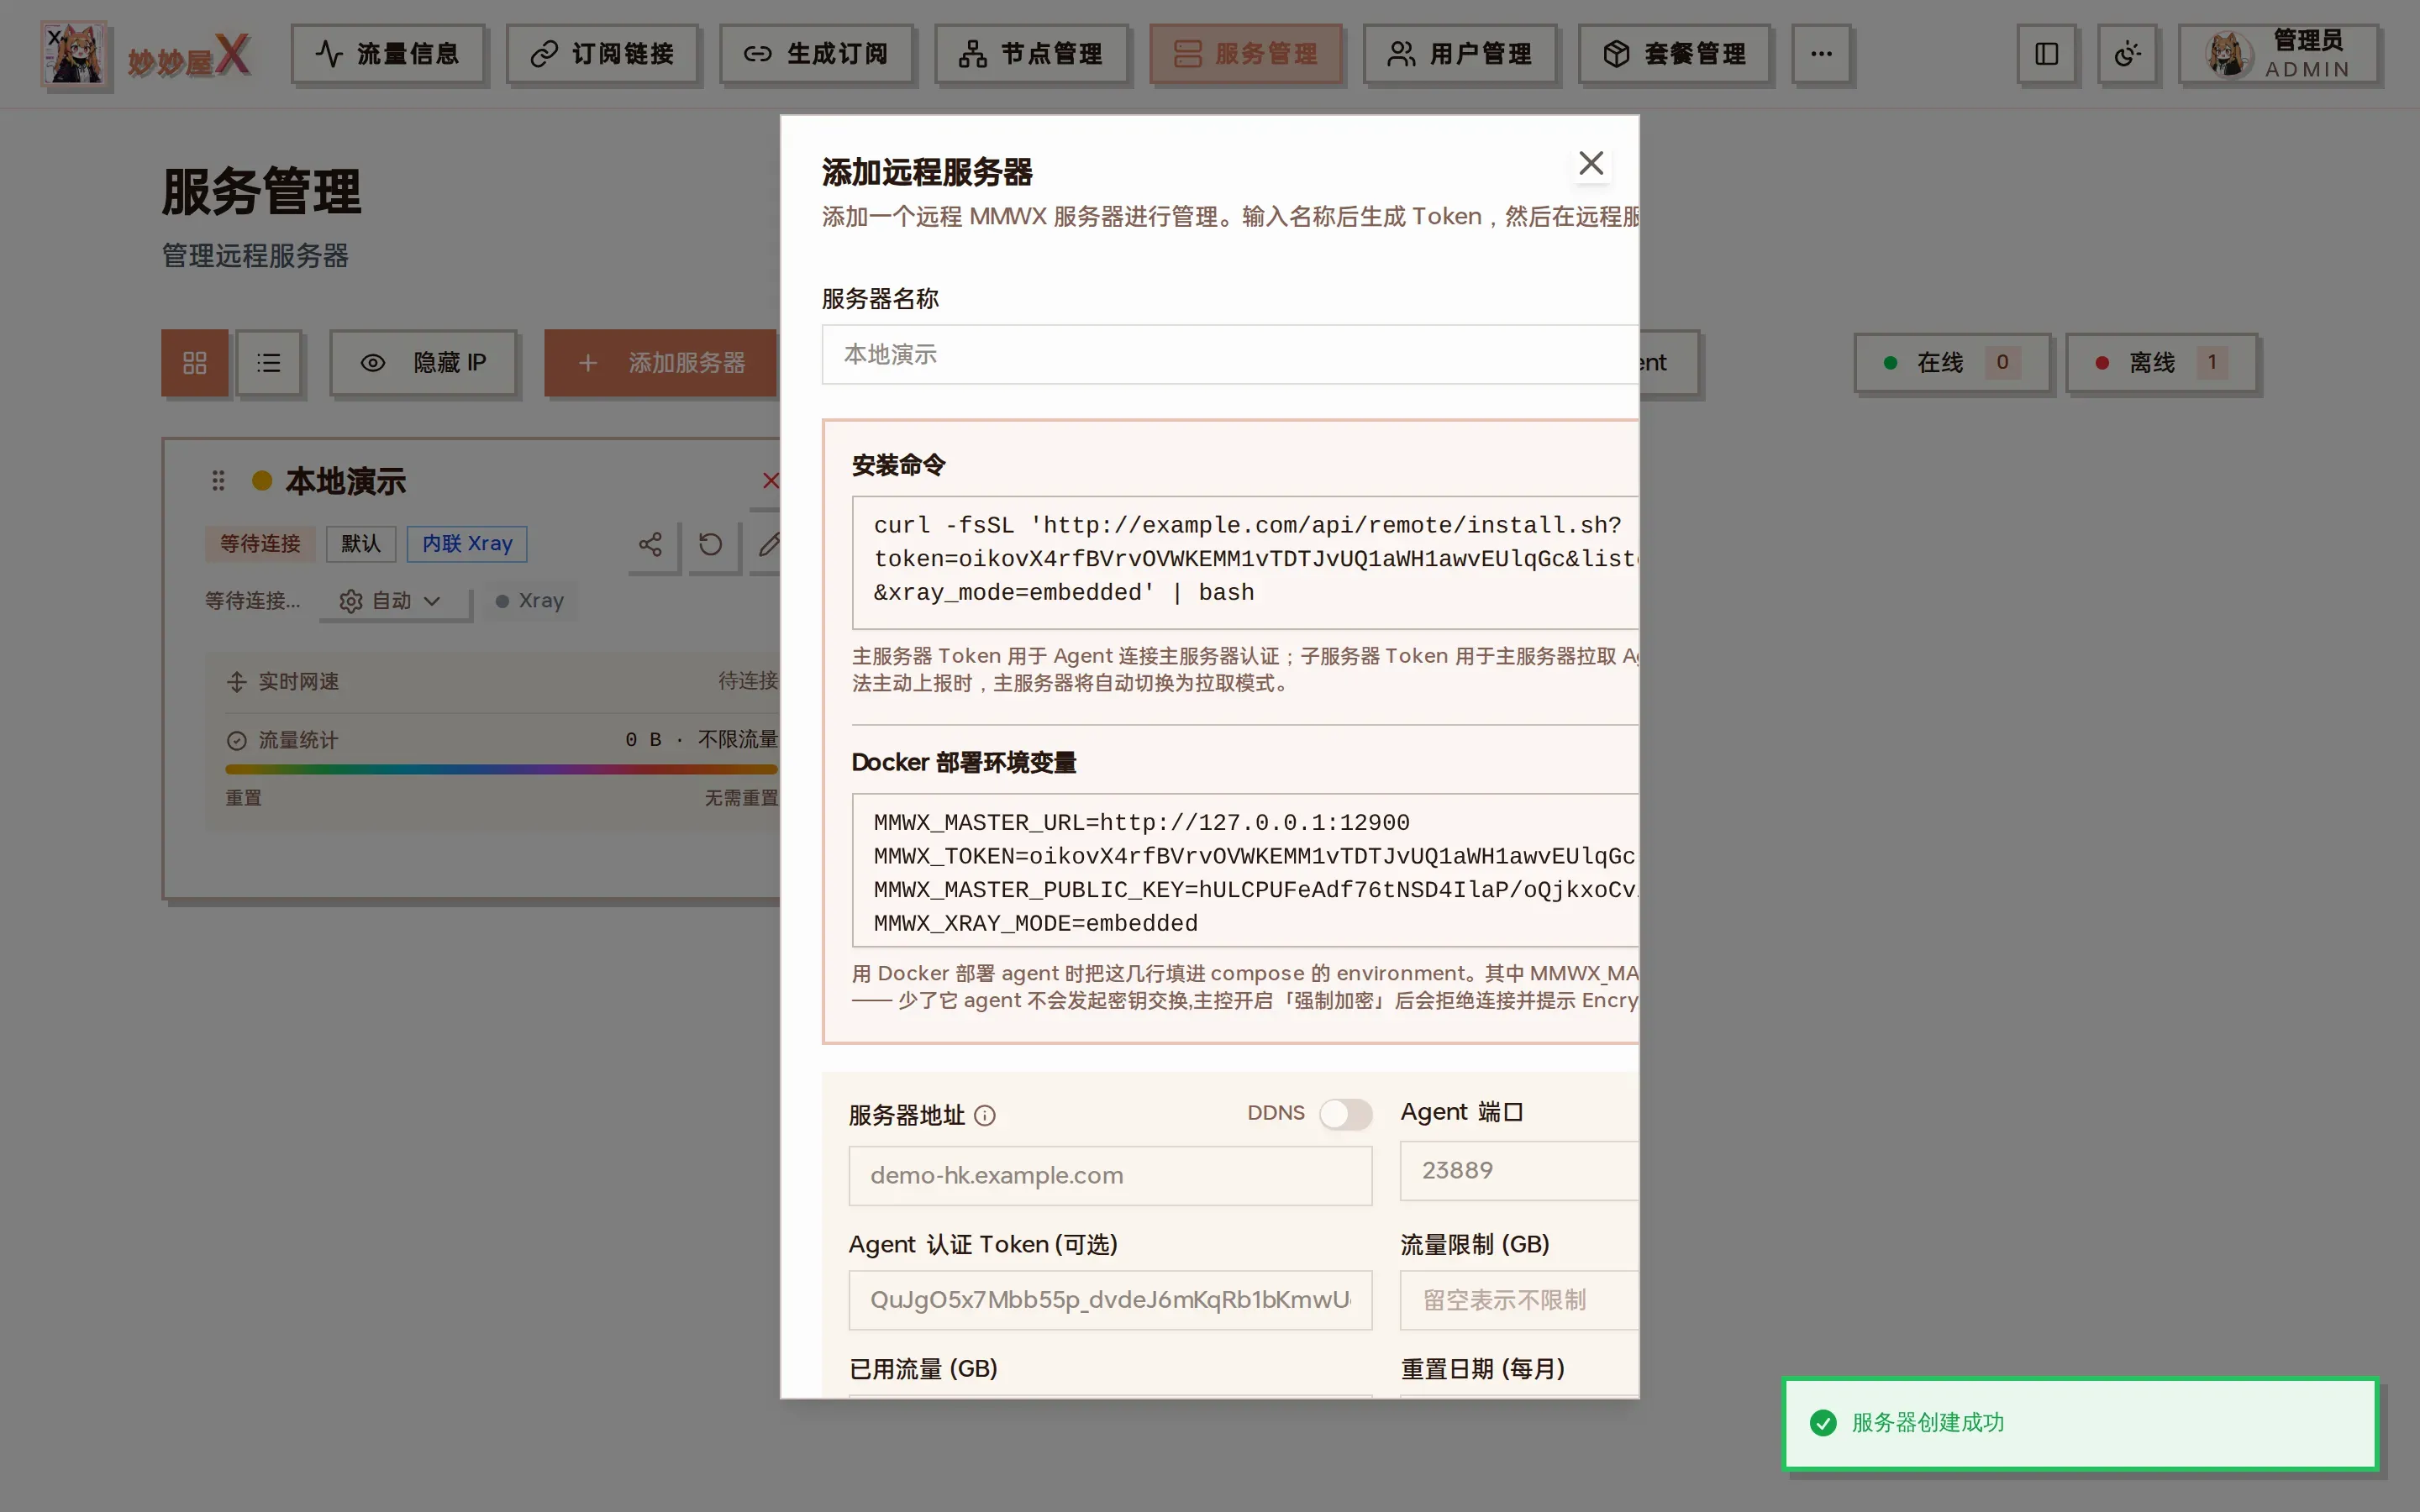
After “Generate Token”: the one-click install command and the Docker environment variables (including MMWX_MASTER_PUBLIC_KEY)
- Log in to the master management panel
- Go to the “Xray Servers” page
- Click “Add Server” and enter server name and IP
- After saving, the system automatically generates the install command for that server
Try it: add a server
Section titled “Try it: add a server”Walk through the master’s Add Remote Server dialog — every field, radio and toggle matches production. Click Generate Token to get a mock pairing token and the matching one-click install command (fully local, no network calls).
Try it: add a server
Walk through the master's Add Remote Server dialog — every field, radio and toggle matches production. Click Generate Token to get a mock pairing token and the matching one-click install command (fully local, no network calls).
Step 2: Copy the One-Click Install Command
Section titled “Step 2: Copy the One-Click Install Command”Find the “One-Click Install Command” in the server details and click the copy button. The command format is as follows:
# 外置 Xray 模式(默认,会自动安装独立 xray)curl -fsSL https://your-domain.com/api/remote/install.sh?token=SERVER_TOKEN | bash
# 内联 Xray 模式(无需独立 xray,Agent 自身嵌入 xray-core)curl -fsSL "https://your-domain.com/api/remote/install.sh?token=SERVER_TOKEN&xray_mode=embedded" | bash
Each server has a unique Token. The command already includes the server’s authentication info and master address.
Installer URL params
Section titled “Installer URL params”| Param | Default | Description |
|---|---|---|
| token | — | Server pairing token from the master (required) |
| xray_mode | external | embedded or external (default) |
| steal_self | 0 | Set to 1 to auto-install nginx and enable steal-self mode |
| listen_port | 23889 | Starting listen port; auto-increments on conflict up to 20 retries |
Step 3: Run on the Remote Server
Section titled “Step 3: Run on the Remote Server”SSH into the remote server and run the copied command with root privileges. The script automatically completes the following 6 steps:
| Step | Operation | Description |
|---|---|---|
| 1/6 | Stop old service | Stop existing mmwx service if running |
| 2/6 | Create config | Generate /etc/mmw-agent/config.yaml |
| 3/6 | Create systemd service | Register as system service with auto-start on boot |
| 4/6 | Download binary | Auto-detect architecture (amd64/arm64), download from GitHub |
| 5/6 | Start service | Enable and start the mmwx service |
| 6/6 | Verify installation | Check service status and output result |
Docker Deployment
Section titled “Docker Deployment”Besides the one-click bare-metal + systemd script, you can also pull the Docker image directly. The image ships with embedded xray-core + nginx + all dependencies — pull and run, no in-container installation needed.
The lower half of the “Generate Token” dialog lists the Docker environment variables; copy them into the compose environment block.
docker run
Section titled “docker run”Good for manual / one-off testing. The token comes from the master “Add Server” form — same token as the one-click script generates.
# host 网络必须 --network host(强制约束,容器内 entrypoint 会检测;bridge 模式直接退出报错)docker run -d \ --name mmw-agent \ --network host \ --cap-add NET_ADMIN \ --restart unless-stopped \ -e MMWX_LISTEN_PORT=12888 \ -e MMWX_MASTER_URL=https://master.example.com \ -e MMWX_TOKEN=<token generated when adding the server on the master> \ -e MMWX_MASTER_PUBLIC_KEY=<master identity public key> \ -e TZ=Asia/Shanghai \ -v /etc/localtime:/etc/localtime:ro \ -v $(pwd)/config:/etc/mmw-agent \ -v $(pwd)/xray-config:/usr/local/etc/xray \ -v $(pwd)/nginx-cert:/etc/nginx/cert \ -v $(pwd)/nginx-servers:/etc/nginx/servers \ ghcr.io/mmwx-group/mmwx-agent:latestAll 4 volumes (config / xray-config / nginx-cert / nginx-servers) are optional (the container has its own dirs). Mapping them out mainly helps with debugging or preserving state across image upgrades.
Note that ./config is never populated with a config.yaml — for Docker deployments the environment variables above are the configuration; the container does not write them out to a file. An empty directory here is normal and does not mean the setup failed. You only put something in it if you want to hand-write a config.yaml and point the agent at it with -c /etc/mmw-agent/config.yaml.
MMWX_MASTER_PUBLIC_KEY is the master identity public key. The one-click script writes it into config.yaml automatically; Docker deployments do not run that script, so you must set it by hand. If the master has force-encryption enabled and this is missing, the agent never starts a key exchange and keeps logging authentication failed: Encryption required. Where to get it: master panel -> Servers -> the server -> details -> “Docker deployment environment variables”, and copy the whole block.
TZ and /etc/localtime control the timezone inside the container. With neither set the container runs on UTC and log timestamps are hours off. Mounting /etc/localtime keeps it in sync with the host; set only TZ if you want a different timezone (when both are present, TZ wins).
The token variable is MMWX_TOKEN. Older docs said MMWX_MASTER_TOKEN, which the agent does not read — copying that leaves the container looping on authentication failed: Token required. Recent agents accept the old name as well, but use MMWX_TOKEN for new deployments.
Docker Compose
Section titled “Docker Compose”Recommended for production — docker compose pull / up -d makes future upgrades smoother.
version: '3.8'services: mmw-agent: image: ghcr.io/mmwx-group/mmwx-agent:latest container_name: mmw-agent restart: unless-stopped network_mode: host # 必须 host,bridge 模式 entrypoint 会拒启 cap_add: - NET_ADMIN environment: - MMWX_LISTEN_PORT=12888 - MMWX_MASTER_URL=https://master.example.com - MMWX_TOKEN=<token generated when adding the server on the master> - MMWX_MASTER_PUBLIC_KEY=<master identity public key> - TZ=Asia/Shanghai volumes: - /etc/localtime:/etc/localtime:ro - ./config:/etc/mmw-agent - ./xray-config:/usr/local/etc/xray - ./nginx-cert:/etc/nginx/cert - ./nginx-servers:/etc/nginx/serversStart with: docker compose up -d
Hard constraints / FAQ
Section titled “Hard constraints / FAQ”- Host network: Required. Bridge mode is rejected by the entrypoint — bypassing is not recommended.
- Xray mode: The image has no external xray binary, only embedded mode is supported. Select “embedded” when adding the server in the master UI (requires PRO license; the agent itself does not verify signatures).
- Nginx: Pre-installed via apt + symlinks compatible with hardcoded paths. The master’s “install nginx” request returns “already installed” immediately, no install action triggered.
- Bypass host check (debug): Not recommended. May hit port conflicts. Debug only:
-e MMWX_REQUIRE_HOST_NETWORK=0
Automatic Xray Installation
Section titled “Automatic Xray Installation”The installer decides whether to install Xray based on the xray_mode flag. External mode (xray_mode=external, default) installs standalone Xray via XTLS/Xray-install (skipped if already present); the Agent controls it over gRPC. Embedded mode (xray_mode=embedded) does NOT install standalone Xray — xray-core is baked into the Agent binary and started by the Agent process.
# 仅 xray_mode=external(默认)时脚本会自动执行下面这条bash -c "$(curl -L https://github.com/XTLS/Xray-install/raw/main/install-release.sh)" @ install# xray_mode=embedded 时跳过这一步:Agent 自身嵌入 xray-core,不需要 /usr/local/bin/xrayGenerated Configuration File
Section titled “Generated Configuration File”/etc/mmw-agent/config.yaml
Section titled “/etc/mmw-agent/config.yaml”# MMWX Remote Server Configuration# Generated by install script
mode: remotemaster_url: https://your-domain.comtoken: SERVER_TOKENconnection_mode: websocket # websocket | http | pull | autoxray_mode: external # external | embeddedsteal_mode: # 留空 / tunnel(自动偷自己时填 tunnel)master_public_key: <BASE64_PUBLIC_KEY>listen_port: "23889"All fields are generated by install.sh based on URL parameters; after manual edits run systemctl restart mmw-agent.
Generated systemd Service
Section titled “Generated systemd Service”/etc/systemd/system/mmw-agent.service
Section titled “/etc/systemd/system/mmw-agent.service”[Unit]Description=MMW Agent Remote ServerAfter=network.target
[Service]Type=simpleExecStart=/usr/local/bin/mmw-agent -c /etc/mmw-agent/config.yamlRestart=alwaysRestartSec=5WorkingDirectory=/var/lib/mmw-agent
[Install]WantedBy=multi-user.targetThe installer picks the right init system automatically: systemd / OpenRC (Alpine) / nohup+rc.local (LXC fallback).
Connection Mode
Section titled “Connection Mode”The one-click installation uses WebSocket connection mode by default. To change it, edit the connection_mode field in /etc/mmw-agent/config.yaml.
| Mode | Value | Description |
|---|---|---|
| WebSocket | websocket | Recommended. Agent actively connects to master, maintaining a persistent connection |
| HTTP | http | Master directly calls Agent API, requires Agent port to be reachable |
| Pull | pull | Agent periodically pulls instructions, suitable for NAT environments |
| Auto | auto | Automatically tries WebSocket -> HTTP -> Pull fallback chain |
Common Operations Commands
Section titled “Common Operations Commands”# 查看服务状态systemctl status mmw-agent
# 查看实时日志journalctl -u mmw-agent -f
# 重启服务systemctl restart mmw-agent
# 停止服务systemctl stop mmw-agent
# Alpine (OpenRC):# rc-service mmw-agent {status|start|stop|restart}# tail -f /var/log/mmw-agent.log# LXC / 无 init 系统兜底:# pgrep -af mmw-agent# tail -f /var/log/mmw-agent.logUpgrade and reinstall
Section titled “Upgrade and reinstall”When a new release is out, the version badge on the server card shows a red dot; click it or “Upgrade Agents” at the top to upgrade remotely without SSH. The card’s “Agent” menu also offers “Uninstall Agent”.
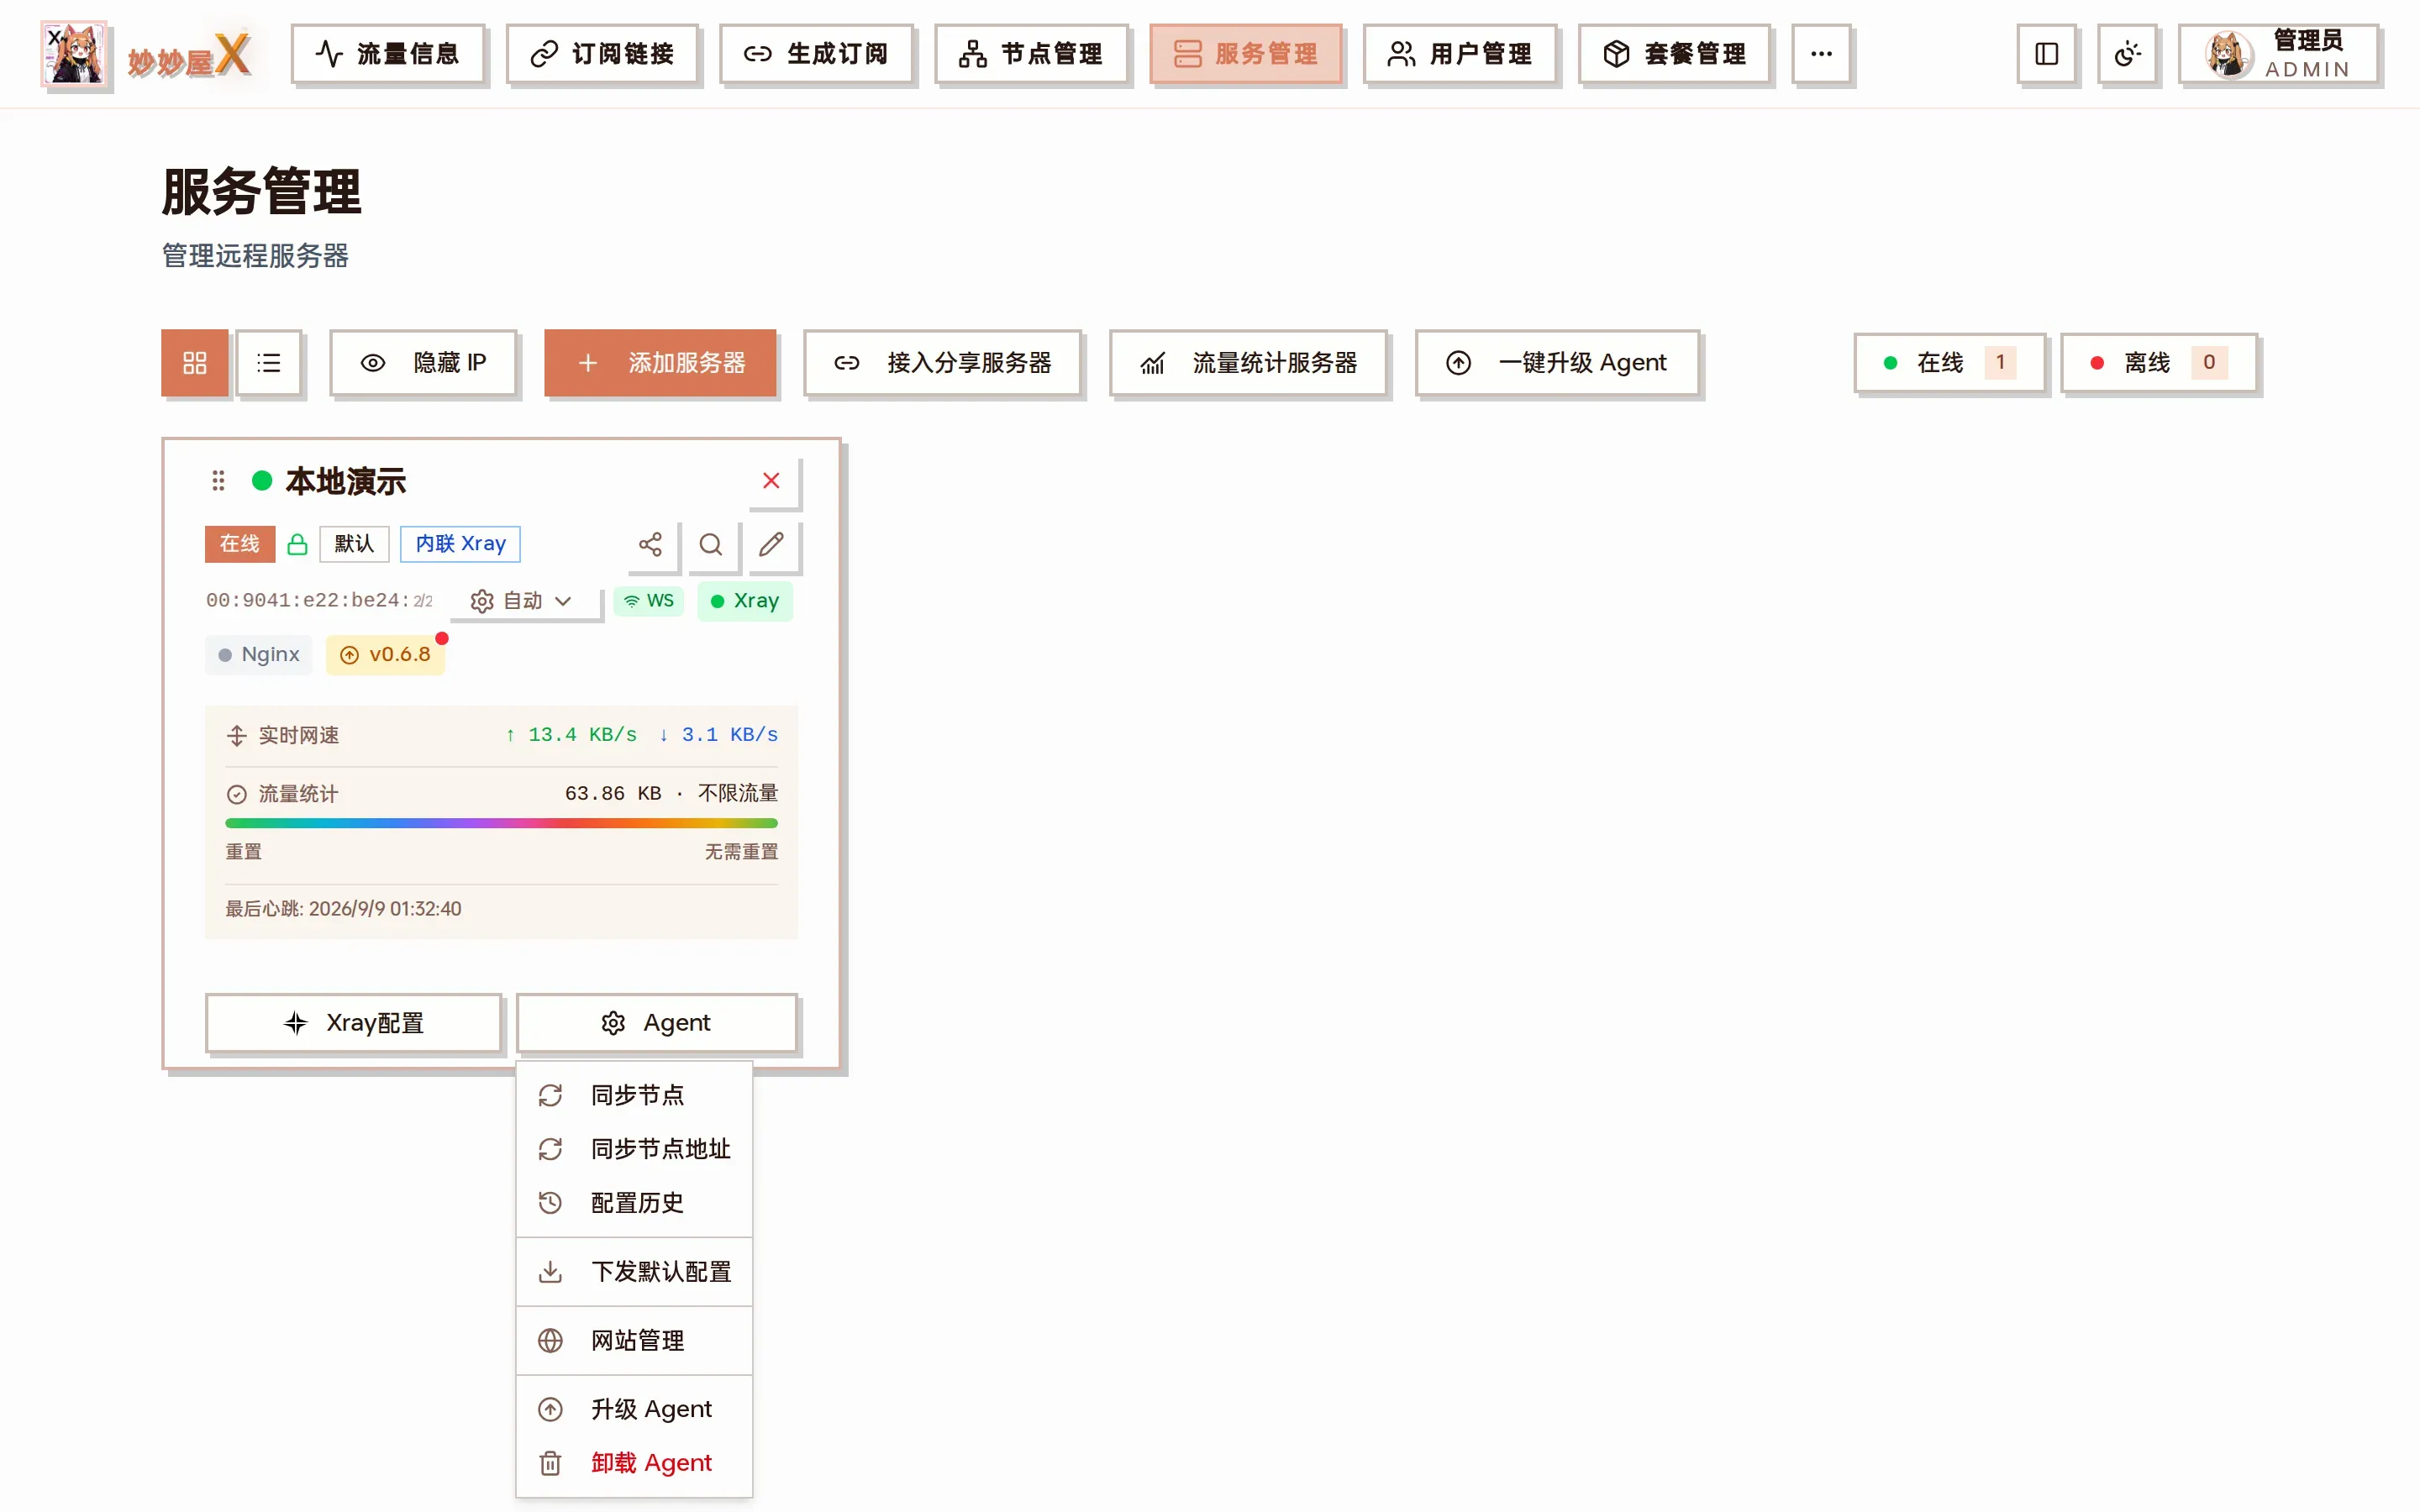
Agent menu: sync nodes / sync node addresses / config history / push default config / websites / upgrade Agent / uninstall Agent
If the Agent has issues, open “Edit server” to get the install command again and re-run it. The script automatically stops the old service, reinstalls, and restarts.
Supported Architectures
Section titled “Supported Architectures”| Architecture | uname -m | Download File |
|---|---|---|
| x86_64 | x86_64 | mmw-agent-linux-amd64 |
| ARM64 | aarch64 / arm64 | mmw-agent-linux-arm64 |